
Watch a quick video tutorial or scroll down to read our step-by-step instructions on how to create Email Campaigns:
What are Email Campaigns?
Email Campaigns in Cohart are a powerful tool that allows users to engage directly with their audience, subscribers, and followers. By sending personalized and automated emails, artists and galleries can nurture relationships with their fans, promote their work, and drive traffic to their Cohart profile.
Email campaigns are a great way to keep your audience informed about new releases, upcoming events, special offers, and more—helping you stay top-of-mind and build stronger connections over time.
Why should an artist use Cohart's Email Campaigns?
Step 1: Set Up an Email Campaign
How to Edit an Email Campaign?
How to View an Email Campaign's Performance?
Frequently asked questions about Email Campaigns
Why should someone use Cohart's Email Campaigns?
Email campaigns provide numerous benefits for users looking to grow their following and increase sales:
-
Increase Connections with Your Audience
Sending personalized emails helps you establish a direct line of communication with your audience, whether they are subscribers, followers, or potential customers. Keeping your fans engaged with regular updates strengthens your relationship and keeps them invested in your journey as an artist or gallery. -
Boost Sales and Promote Your Work
By using email campaigns, you can promote new artworks, exclusive sales, or limited-time offers directly to those most likely to buy. This personal connection encourages higher engagement and can directly lead to more sales, whether for original pieces, prints, or event tickets. -
Gain Traction to Your Cohart Profile
Every email you send can include a link to your Cohart profile, helping drive traffic to your profile. This increases your visibility, helps you build a larger audience, and creates more opportunities for new followers to discover and support your work. -
Automated Updates and Recurring Engagement
Cohart’s automated email options allow you to set up recurring emails (like weekly newsletters or monthly highlights), ensuring that your audience remains informed without requiring constant effort on your part. This consistent engagement can lead to higher loyalty and increased word-of-mouth promotion. -
Track and Optimize Performance
With Cohart’s performance analytics, you can track how your emails are performing (open rates, click-through rates, etc.) and use this data to optimize your future campaigns. This ensures you’re always improving your outreach strategy.
Learn about Contacts and Subscribers before creating your first email campaign.
Step 1: Set Up an Email Campaign
- Navigate to the Email Campaigns tab in your Dashboard
- Click on
+ Create New Campaign, found in the center or top right corner of the page - Enter the email campaign's title, this will not show up in the email sent to your recipients
- Select your Recipients and Sending Options
Recipients Options
- Select your recipients:
- All contacts (default): Send to your entire contact list.
- Groups: Send to specific groups such as subscribers, art buyers, or event attendees.
- Individuals: Send personalized emails to specific followers or fans.
- Switch to Groups, and click on
Select Groupsto a list of available groups; you can also search for the group's name. Click on the desired group(s) to add all contacts in that group(s) to the recipients list. - Switch to Individuals, and click on
Select Individualto a list of available groups; you can also search for the individual's name. Click on the desired contact(s) to add to the recipients list.

Sending Options
- Select your sending options:
- One Time Only Send Immediately (default): Deliver your email immediately to engage your audience, suitable for time-sensitive emails.
- One Time Only Schedule for Later: Deliver your email at a specific time in the future, suitable for artwork drops, announcements, or event-based promotions.
- Recurring Daily: Deliver your email at a fixed time every day, suitable for daily reminders.
- Recurring Weekly: Deliver your email at a fixed time on selected days of the week, suitable for weekly updates.
- Recurring Monthly: Deliver your email at a fixed date of the month, suitable for monthly newsletters.
- If you select One Time Only Send Immediately, your email will be sent as soon as you click on the
Sendbutton in Step 2 - If you select One Time Only Schedule for Later, you will need to pick a date and time in the future for the email to be sent
- If you select Recurring Daily: Deliver your email at a fixed time every day, suitable for daily reminders.
- If you select Recurring Weekly: Deliver your email at a fixed time on selected days of the week, suitable for weekly updates.
- If you select Recurring Monthly: Deliver your email at a fixed date of the month, suitable for monthly newsletters.
- Click Save to
Saveyour progress, orContinueto save and continue to Step 2
The Time Zone in Sending Options will automatically show your current time zone. You can edit this to ensure your emails are sent to the audience at a time suitable for them.
Example: if the majority of your audience is in the UK, but you are in the US, you can change the Time Zone to Europe/London.
Step 2: Design the Email
Email Templates
Cohart provides pre-designed email templates that you can customize, making it easier to create professional emails without the need for design expertise. An email template will typically have some pre-set text blocks with placeholder texts and image blocks—they act as guidances for you to customize with your own information.
- Welcome/About me: For sending a first introduction about yourself to new followers
- New Artwork Released: For announcing new artwork released on Cohart
- Event Invitation: For informing audience of a new event or show that you will be participating in
- Blank: Start your email design from scratch

Customize Your Email Layout
Structure your email with flexible column options, drag-and-drop editing, and dynamic content support.
Use Column Layouts
-
Choose from a range of layout options under the Layouts section in the left pane:
-
2 Columns (1/2 : 1/2)
-
1/3 : 2/3
-
2/3 : 1/3
-
3 Columns (1/3 each)
-
4 Columns (1/4 each)
-
-
Click and drag a layout block into your email to get started with a custom structure.
Drag and Drop Content
- Add elements like Text / Paragraph, Images, or Artworks by dragging them into any section or column.
- You can also rearrange elements by dragging them between columns or sections for full layout control.
Adjust Padding for Elements
- Click on a text, image, or artwork element to access its settings.
- Use the Padding controls to adjust spacing around the element, helping fine-tune alignment and visual flow.
Edit Text
From a template, you can replace any of the pre-set texts with your information.

Format Texts
You can easily format your text to highlight important information, improve readability, and create visually engaging emails. Here’s how you can format your texts:
-
Bold: Highlight the text you want to bold and click the B button in the toolbar or use the shortcut
Ctrl + B(Windows) /Cmd + B(Mac)
-
Italic: Highlight the text you want to italicize and click the I button in the toolbar or use the shortcut
Ctrl + I(Windows) /Cmd + I(Mac)
-
Underline: Highlight the text you want to underline and click the U button in the toolbar or use the shortcut
Ctrl + U(Windows) /Cmd + U(Mac)
- Hyperlink: Highlight the text you want to add a link to and click the 🔗 button in the toolbar, then paste the link you want
-
Align Text: Click the corresponding buttons to align your text to the left, right, or center of the email

-
Change Heading Styles: Highlight your text and choose the appropriate heading style from the toolbar to add hierarchy and further design personalities to your email
Add Images/GIF
To make your emails visually appealing, you can add images from your device:
-
In the Images section on the left toolbar, and click on
+ Uploadbutton -
Select the image/gif file from your computer or device that you wish to upload
-
Once the image is uploaded, drag and drop it from the left toolbar to the desired position in the email body
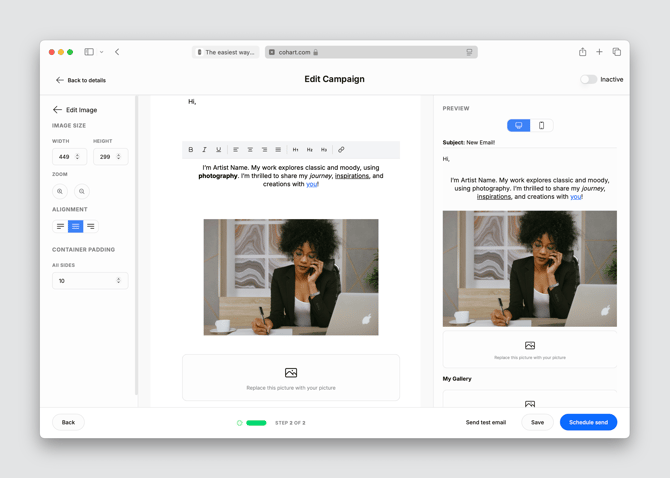
Edit Images
After inserting an image, you can adjust its size, alignment, and padding to ensure it fits well within your email layout:
-
Click on the image in the email editor, the left toolbar will change to an Edit Image panel
- Size: Enter custom Width and Height for the image to adjust its size
-
Zoom: Use the zoom in/out icons to adjust the size of the image
-
Align: To align the image left, right, or center (default), select the corresponding alignment icon from the toolbar
-
Padding: To add space around your image, enter a custom number (pixels) in the Padding field
Add Artworks
To showcase your existing works, you can easily add artwork directly from your Cohart profile:
- In the Artworks section on the left toolbar, search for an artwork on Cohart or browse from the list
- Drag and drop the selected existing artwork into the email editor
Remove Content
-
Hover over the section you wish to remove (text, image, or artwork)
-
A small delete icon 🗑️ (trash can) will appear. Click it to remove that content block
Preview Email
Before sending your email, it’s important to preview how it will look on both desktop and mobile devices:
-
Desktop: The default preview shows your email as it would appear on a desktop computer. You can check the layout, text alignment, and images here
-
Mobile: To see how your email will look on mobile devices, click the Mobile Preview button on top of the preview panel. This allows you to check how the email will display on smaller screens and ensure that everything looks good
Send Test Emails
To ensure everything looks perfect before sending it to your audience, you can send a test email to yourself. Click the Send test email button at the bottom navigation of the email editor, the email will be sent to your email address (associated with the current Cohart account). This allows you to review the email as if you were a recipient and make any necessary adjustments.
Save, Send Now, or Schedule
Once your email is ready, you have several options to finalize the delivery:
-
Save: If you’re not ready to send your email yet, click
Saveto save your progress and return to it later. -
Send Now: For One Time Only Send Immediately campaigns, click
Sendto deliver the email to your selected recipients right away -
Schedule Send: For One Time Only Schedule for Later or Recurring campaigns, click
Scheduleto deliver the email at the date and time of your choosing
How to Edit an Email Campaign?
- Navigate to the Email Campaigns tab in your Dashboard
-
Find the campaign you wish to edit, click on the campaign row to enter the Campaign details page, then click on
Edit campaign -
Or, from the campaign list, click on the
···context menu of the campaign you wish to edit, and click onEdit -
Edit the email content, design, or recipient list as needed
Changes made to an email campaign after it has been sent will not affect emails that have already been delivered. Edits will only apply to future emails of the edited campaigns.
How to View an Email Campaign's Performance?
After sending a campaign, you can easily track its performance:
- Navigate to the Email Campaigns tab in your Dashboard
-
Find the campaign you wish to view, click on the campaign row to enter the Campaign Details page
- Or, from the campaign list, click on the
···context menu of the campaign you wish to view, and click onView Details -
In the Reports section of the Campaign Details page, you can view the following key metrics:
-
Delivery Rate: The percentage of emails successfully delivered
- Open Rate: The percentage of recipients who opened your email
- Click-Through Rate (CTR): The percentage of recipients who clicked on links within the email
- Bounce Rate: The percentage of undelivered emails
- Unsubscribe Rate: The percentage of recipients who unsubscribed from your email list
-
- Adjust the timeframe to get reports for only specific period of time, ie. campaigns for a particular event, etc.
-
For every email sent from a campaign, you can also view its individual performance, allowing you to track how each piece of content resonates with your audience
Here are some frequently asked questions about Email Campaigns
Can I send an email campaign to a specific group of followers?Yes, you can target specific groups such as your subscribers, buyers, or event attendees by selecting the appropriate contact list or segment.
How can I increase sales using email campaigns?
You can drive sales by promoting new artwork, offering limited-time discounts, or announcing exclusive offers directly to your followers through email campaigns.
Can I automate email updates for my audience?
Yes, you can set up recurring email campaigns to automatically update your audience with regular newsletters, new releases, or upcoming events.
How do I track the success of my email campaign?
Cohart provides detailed stats on delivery rate, open rate, click-through rate, and other key metrics, allowing you to measure how well your email campaign performed.
Can I reschedule or edit an email once it’s been sent?
You can edit future emails or reschedule them before sending, but changes won’t affect already sent emails.
How many emails can I send?
Depends on your Cohart plan. If you run out of the monthly email credits, you can purchase more. Learn more.
What happens if my credits run out and I cannot send a scheduled campaign?
If there isn't enough credits to send a campaign, your campaign will become inactive. You can purchase more credits and re-activate it to make sure your emails are sent smoothly, at the correct time.